Darren Smith, Flight Instructor
  Home | Login | Schedule | Pilot Store | 7-Day IFR | IFR Adventure | Trip Reports | Blog | Fun | Reviews | Weather | Articles | Links | Helicopter | Download | Bio

Site Map

Subscribe

Private Pilot
  Learn to Fly

Instrument Pilot
  7 day IFR Rating
  IFR Adventure

Commercial Pilot

Multi-Engine Pilot

Human Factors/CRM

Recurrent Training

Ground Schools

Articles

Privacy Policy
About Me

Keyword:
  

Support this Website

IFR Lesson Guides - Constant Rate

IFR Lesson Guides:  Intro | Basic Attitude Instruction | Cockpit Check | Pitch Control | Bank Control | Power Control | Constant Airspeed | Turns | ITO | Constant Rate | Compass | Steep Turns | Unusual Attitudes | Precision Flight | Bravo Pattern | Descent Profile
IFR Navigation:   General Info Instrument Rating | Instrument Rating Lesson Plans | 7-day IFR Rating | IFR Adventure | Instrument Ground School | Safety Pilot | Holding | IFR Risk | Trip Reports | Flight Profiles | After the IFR Rating | Checkride Reviewer | Visi-Hold | Are you  ready?
Next>>
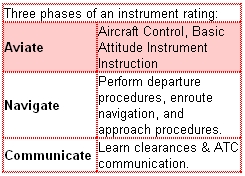
Three phases of an instrument rating

Rate Climbs and Descents 

1. Climbs at a Definite (Indicated) Rate 

a. While maintaining straight-and-level flight, change to climb airspeed. 

b. Enter a climb from an exact altitude with climbing airspeed. 

c. Advance the power to the approximate setting that will result in a 500-foot per minute rate of climb. Simultaneously adjust pitch attitude to maintain a constant airspeed. 

d. As the power is advanced in the climb entry, the airspeed indicator becomes primary for pitch and remains so until the vertical speed approaches a rate of climb of 500 feet per minute. At this time, the vertical-speed indicator becomes primary for pitch and remains so for the remainder of the climb. The airspeed indicator again becomes the primary instrument for power. 

e. The heading indicator is primary for bank throughout the maneuver. 

f. Show that any deviation in vertical speed indicates the need for a pitch change, and that the airspeed is controlled by the use of power. 

g. Show how pitch and power changes must be coordinated closely. For example: 
(1) If the vertical speed is correct but the airspeed is high, reduce power. 
(2) If the vertical speed is high and the airspeed is low, reduce pitch. 
(3) If the vertical speed is low and the airspeed is low, increase both pitch and power. 
(4) If the vertical speed is high and the airspeed is high, reduce both pitch and power. 

h. Emphasize trim throughout. 

2. Level-Off from a Climb at a Definite (Indicated) Rate. 
Follow the same procedure that was described previously for level-off from a constant airspeed climb. 

3. Descents at a Definite (Indicated) Rate 

a. Enter a descent from an exact altitude and descending airspeed. 
b. Reduce power to the approximate setting for a 500-foot per minute rate of descent, simultaneously adjusting pitch attitude to maintain a constant airspeed. 
c. As the power is reduced in the descent entry, the airspeed indicator is primary for pitch and remains so until the vertical speed approaches a rate of descent of 500 feet per minute. At this time, the vertical-speed indicator becomes primary for pitch and remains so for the remainder of the descent. As the vertical-speed reaches 500 feet per minute, the airspeed indicator becomes the primary instrument for power. 
d. The heading indicator is primary for bank throughout the maneuver. 
e. Show how pitch and power changes must be coordinated (see examples given for climbs). 
f. Emphasize trim. 
4. Level-Off from a Descent at a Definite (Indicated) Rate. 
Follow the same procedure that has been described previously for level-off from constant airspeed descents. 

5. Student Practice - Make climbs and descents at a definite indicated rate. 

6. Calibration of the Vertical-Speed Indicator 

a. Establish a climb or descent at a 500-foot per minute indicated rate. 
b. Each 15 seconds, check the altimeter for a 125-foot altitude change. 
c. If the altitude change is more or less than 125 feet, adjust the vertical speed accordingly. 
d. Repeat the procedure until a vertical speed is determined that will produce the desired rate. 
e. Any error found during calibration should be considered during subsequent rate climbs or descents. 
7. Student Practice - Calibrate the vertical-speed indicator during both climbs and descents. 

8. Climbs at a Definite (Absolute) Rate 

a. Establish climbing airspeed. 
b. As the clock second hand passes any cardinal point (12, 3, 6, or 9), enter the climb using the same technique that has been described for the entry into a climb at a definite indicated rate. 
c. The primary pitch, bank, and power instruments are the same as those which are primary during climbs at a definite indicated rate. 
d. Since the aircraft does not start climbing immediately after power is applied, the altimeter is approximately 20 to 30 feet behind the clock. This lag is maintained throughout the climb. 
e. Use the first 30 seconds to establish the proper vertical speed and trim. 
f. Check the clock and altimeter every 15 seconds thereafter for 125 feet of altitude change. 
g. Show the student how to correct for any errors. 
9. Level-Off from a Climb at a Definite (Absolute) Rate. 
Follow the same procedures that were described previously for level-off from a constant airspeed climb. 

10. Student Practice  -  Make climbs and descents at a definite absolute rate. 

Vertical S, S-1, and S-2 

1. Vertical S  -  This maneuver is a series of climbs and descents at a definite indicated rate. 

a. Climbing or descending airspeed should be established prior to entry. 

b. During the reversal of vertical direction, lead the altitude 40 to 60 feet in descents and 20 to 30 feet in climbs. 

c. Change the altitude 500 feet, 400 feet, 300 feet, then 200 feet, returning to the original altitude each time. After the 200-foot altitude change, return to the original altitude and level-off at climbing or descending airspeed (low cruise). 

d. Performing the Vertical S. 
(1) From an exact altitude and climbing or descending airspeed, adjust power and pitch attitude to enter a climb or descent. 
(2) As the power is adjusted in the entry, the airspeed indicator becomes primary for pitch. 
(3) As the vertical speed approaches 500 feet per minute, the vertical-speed indicator becomes primary for pitch and remains so until the reversal of the vertical direction is started. As the vertical speed reaches 500 feet per minute, the airspeed indicator again becomes the primary instrument for power. 
(4) As the reversal of the vertical direction is started, the airspeed indicator becomes primary for pitch and remains so until the vertical speed approaches the desired rate of 500 feet per minute. 
(5) Stress the importance of trim and cross-check. 

2. Vertical S-1 -  This maneuver is a combination of the vertical "S" and a standard rate turn. 
a. Enter in the same manner as a climbing or descending turn. 
b. Reverse the direction of turn with each return to entry altitude. 
c. Emphasize trim and smooth control technique. 
3. Vertical S-2  -  This maneuver differs from the Vertical S-1 in that the direction of turn is reversed with each reversal of vertical direction. 

4. Student Practice - Perform Vertical S, S-1, and S-2: 

a. With all available instruments. 
b. Without the attitude indicator.

Your Thoughts...

Name: (Anonymous posts deleted)

E-mail: (if you want a reply)

How did you hear
of this website?
Message:  (What should I write?)
Business Card
WebSearch
News Group
Safety Seminar
Advertisement
Word of Mouth
Other(specify)
(Required) Enter number from image to send:


Check this out...
  Home | Login | Schedule | Pilot Store | 7-Day IFR | IFR Adventure | Trip Reports | Blog | Fun | Reviews | Weather | Articles | Links | Helicopter | Download | Bio
All content is Copyright 2002-2010 by Darren Smith. All rights reserved. Subject to change without notice. This website is not a substitute for competent flight instruction. There are no representations or warranties of any kind made pertaining to this service/information and any warranty, express or implied, is excluded and disclaimed including but not limited to the implied warranties of merchantability and/or fitness for a particular purpose. Under no circumstances or theories of liability, including without limitation the negligence of any party, contract, warranty or strict liability in tort, shall the website creator/author or any of its affiliated or related organizations be liable for any direct, indirect, incidental, special, consequential or punitive damages as a result of the use of, or the inability to use, any information provided through this service even if advised of the possibility of such damages. For more information about this website, including the privacy policy, see about this website.